| This article contains information on a character, area, item, or quest that has changed in the latest version of Part One as of v1.50. It has been updated to reflect the changes. |
| This article is part of a collection for the walkthrough for Part One. The previous article is The Golden Chalice. The next article is Pia is Missing. |
Overview[]
This is a mandatory quest that happens automatically following the return from the Golden Chalice quest.
Once the Princess enters Betancuria North she will be captured by a mysterious Bearded Man and shown some of the harsh methods the Dhorn use for interrogation.
Notes[]
- Until v1.50 this quest had mostly been a brief intermission of sorts that gave a glimpse of Dhorn hospitality.
Walkthrough[]
|

Captured[]
After returning from the Golden Chalice quest, you should let everyone know you're alright.
If you haven't already, stop by the Hideout and speak with Alfons. He'll ask about your adventures and let you know that Pia has gone missing after a burglary at the Academy in Betancuria North and asks you to investigate. He also suggests you speak with Master Nathan in the Bear Pit. Any secret passages leading to the Bear Pit will be unavailable at this time, so you'll have to make your way there on the surface.
When you enter Betancuria North the Bearded Man, who you may have seen hanging around the restaurant, will capture you with a spell.
| Note: In versions 1.40 and earlier, you were captured by Arto Benthur and a number of Dhorn soldiers. |
The Cells[]
You'll awaken in a short time later in a cell of the Castle. All of your belongings have been taken and the only clothes to be found are some rags on the floor. Rest until a Dhorn guard arrives to escort you to an interrogation room on the upper level with Arto Benthur. Arto will go over a lengthy list of crimes you've been accused of, including prostitution, burglary, and murder. He then takes you to a nearby room and shows you the torture device used on those who don't cooperate with their investigations. Arto then explains that he'll send for you tomorrow and has the guards return you to your cell on the lower level, gagged, blindfolded, and bound.
Once inside it becomes apparent that you've been returned to the wrong cell as you're not alone and a conversation will start with your cell mate, which you recognize as Tarleth Dallows once she helps remove your blindfold. Tarleth, a regular to the city jail for indecent exposure, has found herself locked up here and facing a more harsh sentence for being a repeat offender.
Fortunately for you both Tarleth has managed to steal a key from one of the guards and hide it in a special place, but since you're both bound you'll need to work together. After a considerable amount of effort, you finally manage to retreive the key and unlock your restraints, and the door to your cell. Enable stealth mode and head out into the hallway, but keep an eye out for the guards as they'll come running if they see an open door.
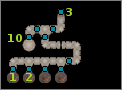
Head east down the hallway. You can check out the other two cells. The first has a prisoner who's gone crazy and the second has the body of Terik Lannesen, who you may remember from the Nightingale quest. It appears Terik had gotten himself into trouble, possibly by looking for another "Sister" to cleanse. Follow the hallway and take the stairs up (#3).
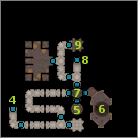
Continue to snake through the hallways on the upper level until you reach the intersection with the device and the glowing door (#7). The door is apparently controlled by the device, but neither of you know how to use it so you'll need to explore the adjoining rooms. You should recognize the lager room with the cage (#6) as Arto had you hear a short while ago. There's nothing to see here, so you'll have to peek inside his room (#5) to see if there's any hints as to how to get out of here. As soon as you open the door, guards will surround you and now you're in trouble.
Arto greets you again, this time taking special notice of Tarleth. When hearing of her minor offenses, Arto displays his callous nature by decapitating her on the spot and has tells his men to feed her remains to the dogs. In shock and disoriented by a flash of light, a guard takes you to a bloodied torture chamber on the lower level (#10). Upon arriving, the guard tells you he's with the Family and you need to escape through the secret passage on the west wall. He leaves you alone following a brief conversation. Grab a torch from the nearby rack one and step into the hidden door.
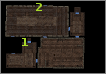
The Escape[]
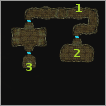
You'll find yourself in an old underground passage. Tracks lead west, but there's a locked door to the south. If you're able to unlock it (DC44), you'll find the Armor of the Maiden in the sarcophagus (#2). Head west down the hallway and follow the tracks south. When you reach the small room with the sarcophagus you'll see tracks leading through the secret stone door on the south wall (#3).
| Note: If nothing happens when you click on the secret door, try moving your character closer and try again. |
Once through, you'll find yourself in another dank passage with large mushrooms. Follow the passage east and take the stairs up to the storage rooms in the Castle.
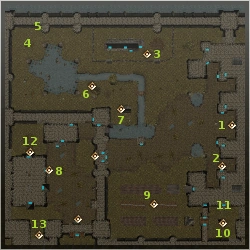
The storage rooms are a mess, apparently due to a significant collapse of the levels above. Head south toward the door and exit to the Castle courtyard (#12). Watch out for the patrolling guards, they're all over the place. Head east into the courtyard and take the stairs right around the corner into the Guards' Quarters (#8).
Like much of the Castle, the guards' quarters are a mess as well. There's not much to see here. Make your way to the rooms on the south west and take the stairs down (#1).
You're now on the upper level of the cells, this time on other side of the glowing door that's controlled by the device (#7). Unlock the door on the west wall and follow the hallway north, then unlock the door on the east wall and grab your belongings from the crate in the small room (#9). Now return upstairs to the Guards' Quarters (#8) and out into the courtyard.
Head toward the south west corner of the courtyard and keep an eye open for the hidden wall door on the southern wall (#13 above) of the Castle and step through into the passage.
You're almost out now. Just follow the passage west and use the pull chain to open the door. Mando Halley will greet you and explain that he was on his way to rescue you. You can let him know about Tarleth's fate. When you're done speaking, he'll take you back to see Nathan in the Bear Pit.
When you tell Nathan about your capture by the bearded man, he explains that it was the same bearded man who sold him the information of your capture for 10,000 gold pieces. It seems he's playing both sides, and making a fortune doing it.
After the debriefing, you free to get some rest and then you can investigate Pia's disappearance.
| This article is part of a collection for the walkthrough for Part One. The previous article is The Golden Chalice. The next article is Pia is Missing. |